آخر المواضيع

‏إظهار الرسائل ذات التسميات ملابس أطفال. إظهار كافة الرسائل

الثلاثاء، 22 أكتوبر 2013

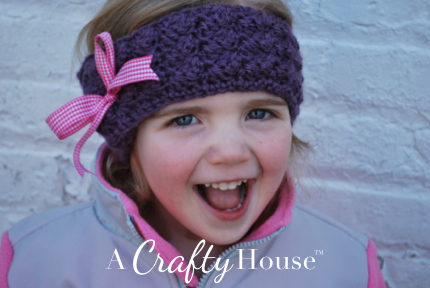
Granny Stripe Headband/Earwarmer


I had to stop in the middle of working my Granny Stripe Boutique Bag the other day and when I set it down realized it would make a perfect headband/earwarmer. I used a smaller hook size so the shells would be closer together. I think it turned out perfectly! I love how these look all stacked together. This pattern is written for children 6-12. You can increase or decrease the size of this by adding or subtracting by 3's to the initial chain. For children 2-5 I would recommend only doing three rows of shells so it's not to bulky. To make it extra warm you could add a layer of fleece as a liner.


This is my beautiful daughter Isabel modeling. She was very patient with me while taking pictures on a cold day. Thanks Boo boo! Its getting REALLY cold here in Kansas! Hope some of you will enjoy this pattern too.

MATERIALS LIST:
Worsted Weight Yarn (I used Impeccable found at Michaels.)
Hook Size 4mm
Scissors
Tapestry Needle

STITCH COMBINATIONS:
Shell is "work 3 dc in same st or sp."
Beginning Shell is "work ch 3, 2 dc in same st or sp."

TIPS:
Join all rounds.
Do not turn after rounds.

Starting out: Ch 67.

Row 1: Work 1 sc in 2nd ch from hook. Continue working sc in each ch st to end. Join w/ sl st in 1st sc. You will now be working in rounds. (66sc)
Rnd 1: Sc in same st as join and in each st to end. Join in top of first sc. (66 sc)
Rnd 2: Work Beginning Shell in same st as join. {Skip 2 stitches, then work Shell in the next st.} Repeat between {} around. Join in top of ch 3. (22 Shells)
Rnd 3: Sl St in each dc of shell into sp between first two shells. Work Beginning Shell. {Work Shell in space between next shell.} Repeat between {} to end. Join in top of ch 3. (22 Shells)
Rnd 4-5: Repeat round 3.
Rnd 6: Ch 1. Sc in next 2 st then sc in sp between shell. Repeat between {} around. Join in top of first sc. (66 sc)
Rnd 7: Ch 1. Sc in next st and in each st around. Join in top of first sc. (66 sc)

Finish off. Whip stitch initial chain together with beginning tail. Weave in ends.

Crochet Ribbon Headband Pattern


Size
This is meant to fit a baby through child (it's adjustable!)


Materials
US Size I (5.5mm) Crochet Hook
1/3 Skein Aran or Worsted weight yarn (I used Vanna's Choice here)
Ribbon about 16" long (I used 5/8" thick but you could go thinner or thicker if you wanted)

Directions
CH 68
Row 1: SC in second CH from the hook and SC to end
Row 2: CH1, turn, in first SC space, *SC, 2DC, skip 2 SC spaces, repeat from * to last SC space, SC
Row 3: CH 1, turn, in first SC space, SC, 2DC, skip 2 DC spaces, *SC, 2DC in SC space, skip 2 DC spaces, repeat from * to last SC space, SC
Rows 4 - 7: Repeat row 3
Row 8: CH1, turn, SC in each space across
Tie off and weave in ends.
Bring your handband ends together, overlapping one end over the other, and weave your ribbon through both ends.  Enjoy!

Abbreviations
CH = Chain
DC = Double Crochet
SC = Single Crochet

baby - Toddler Crochet Socks


Down-loadable PDF crochet pattern found here

Basic Materials needed for pattern: 
*H and I hook
*Worsted weight yarn, I used Caron Simply Soft but I think a nice wool such as cascade 220 would work much better ( :
*Crochet skillz 

Pattern has directions for doing baby/toddler sizes 1-11 

you like?....I like!.....we all like??!

Just in case the download isn't working for you...

Materials:
*H hook and I hook
*2 colors DK weight yarn – MC and CC
*Stitch Marker
*Yarn needle
 
 
Gauge: (with I hook) 8 sc’s and 10 rows = 2 in. square

Notes: These socks are worked in the round, so you will need to use a stitch marker to keep your place. Make sure you keep track of your rows…important.

Pattern comes in sizes Baby/Toddler Shoe sizes 1-11 see baby pattern for sizes 1-5 and see toddler pattern for sizes 6-11
 
Baby
With H hook and CC, Ch. 4
Rnd 1 – 3sc in 2nd chain from hook, sc in next , 3sc in last. Now we will be working on the opposite side of our foundation ch. Sc in last. No join because we are working in the round. (8)  
Note: If you have undesirable holes in the middle of your round, don’t worry – you can sew them shut later
Rnd 2 – 2sc in next 3, sc in next, 2sc in next 3, sc in last. (14)
Rnd 3 – sc in next, 2sc in next 4, sc in next 3, 2sc in next 4, sc in last 2. (22)
Rnd 4 through Rnd 5 – sc even around. (22)
With I hook and MC
Work 7 even sc rows for shoe size 1 – 2 (approx. 3 – 4” foot)
Work 11 even sc rows for shoe sizes 3 – 5 (approx. 4 – 5” foot)
Next Rnd – For Sizes 1-2 sc in next 19, for sizes 4 – 5 sc in next 20, (the rest of the instructions are the same for both sizes) change to H hook and CC, (remove stitch marker and continue on, we will have a new beginning of row after we are done with the heel) sc in next (we will call this stitch CC1), sc in next 9, sc in next (we will call this stitch CC11). Ch 1 and turn (Do not count turning chain as a stitch)
            Heel decrease row 1 – sc2tog, sc in next 7, sc2tog. Ch 1 and turn
            Heel decrease row 2 – sc2tog, sc in next 5, sc2tog. Ch 1 and turn
            Heel decrease row 3 – sc2tog, sc in next 3, sc2tog. Ch 1 and turn
            Heel decrease row 4 – sc2tog, sc in next, sc2tog…now we will start the beginning of our                  increase row…sc down into the side of decrease row 3. Ch 1 and turn
Note: For the next 5 increase rows we will be working down the sides of these decrease rows.
Heel increase row 1 – sc in next 4, sc into the side of row 3, sc into the side of dec row 2. Ch 1 and turn
Heal increase row 2 – sc in next 6, sc into the side of row 2, sc into the side of dec row 1. Ch 1 and turn
Heel increase row 3 – sc in next 8, sc into the side of dec row 1, sc into same st as CC1. Ch 1 and turn
            Heel increase row 4 – sc in next 10, sc into same st as CC11.
 Ankle Rnd 1 – Change to I hook and MC (this next stitch will be the new beginning stitch, so get that stitch marker back out J) sc in each st around. (22)
Ankle Rnd 2 –sc in next 3, 2sc in next, sc in next 3, 2sc in next, sc in next 3, hdc in next 3, hdc2tog, hdc in next, hdc2tog, hdc in last 3.
Ankle Rnd 3 – sc in next 6, 2sc in next, sc in next 6, hdc in next 2, hdc2tog, hdc in next hdc2tog, hdc in last 2. (21)
Ankle Rnd 4 – sc in next 14, hdc in last 7.
Ankle Rnd 5 – sc in next 14, hdc in last 7. 
Ankle Rnd 6 – Change to CC and sc in each st around. Fasten off and weave in all ends.
 
 
Toddler
With H hook and CC, Ch. 6
Rnd 1 – 3sc in 2nd chain from hook, sc in next 3, 3sc in last. Now we will be working on the opposite side of our foundation ch. Sc in last 3. No join because we are working in the round. (12)  
Note: don’t worry about the holes in the middle of your round – you can sew them shut later 
Rnd 2 – 2sc in next 3, sc in next 3, 2sc in next 3, sc in last 3. (18)
Rnd 3 – sc in next, 2sc in next 4, sc in next 5, 2sc in next 4, sc in last 4. (26)
Rnd 4 through Rnd 5 sc even around. (26)
With I hook and MC
Work 16 even sc rows for a shoe size 6-8
Work 20 even sc rows for a shoe size 9-11
Next Rnd – For show sizes 6 – 8 sc in next 22, For shoe sizes 9 – 11 sc in next 23, (The rest of the instructions from here are the same for both sizes) Remove stitch marker and change to H hook and CC. sc in next (we will call this stitch CC1), sc in next 11, sc in next (we will call this stitch CC13). Ch 1 and turn (Do not count turning chain as a stitch)
            Heel decrease row 1 – sc2tog, sc in next 9, sc2tog. Ch 1 and turn
            Heel decrease row 2 – sc2tog, sc in next 7, sc2tog. Ch 1 and turn
            Heel decrease row 3 – sc2tog, sc in next 5, sc2tog. Ch 1 and turn
            Heel decrease row 4 – sc2tog, sc in next 3, sc2tog. Ch 1 and turn
Heel decrease row 5 – sc2tog, sc in next, sc2tog…now we will start the beginning of our increase row…sc down into the side of decrease row 4. Ch 1 and turn
Note: For the next 5 increase rows we will work our increases down the sides of these decrease rows.
Heel increase row 1 – sc in next 4, sc into the side of row 4, sc into the side of decrease row 3. Ch 1 and turn
Heal increase row 2 – sc in next 6, sc into the side of row 3, sc into the side of decrease row 2. Ch 1 and turn
Heel increase row 3 – sc in next 8, sc into the side of decrease row 2, sc into the side of  decrease row 1. Ch 1 and turn
Heel increase row 4 – sc in next 10, sc into the side of decrease row 1, sc into the same st as CC1. Ch 1 and turn
Heel increase row 5 – sc in next 12, sc into same st as CC13.
Ankle Rnd 1 – Change to I hook and MC (this next stitch will be the new beginning stitch, so get that stitch marker back out J) sc in each st around. (26)
Ankle Rnd 2 –sc in next 4, 2sc in next, sc in next 3, 2sc in next, sc in next 4, hdc in next 4, hdc2tog, hdc in next, hdc2tog, hdc in last 4.
Ankle Rnd 3 – sc in next 7, 2sc in next, sc in next 7, hdc in next 3, hdc2tog, hdc in next hdc2tog, hdc in last 3.
Ankle Rnd 4 – sc in next 16, hdc in last 9.
Ankle Rnd 5 – sc in next 16, hdc in last 9. 
Ankle Rnd 6 – Change to CC and sc in each st around. 
Fasten off and weave in all ends.

الثلاثاء، 12 مارس 2013

Crochet Stitches


Crochet stitches and how to make them!


Crochet Stitches
and how to make them
crostiandpic1.1.jpg (80837 bytes)
Chain (ch). Make loop in thread, insert hook in 1oop, and draw main length of thread through. Continue to draw thread through each new loop formed until length desired.

Single Crochet
 (s c). Insert hook under 2 loops of st, draw thread through st (2 loops on hook), thread over hook, draw through the 2 loops.

Half Double Crochet (half d c). Make like d c until there are 3 loops on hook; then thread over and draw through all 3 loops.

Double Crochet
 (d c). Thread over hook, insert hook in st, and draw thread through (3 loops on hook), thread over hook, draw through 2 loops, thread over, and draw through the 2 remaining loops.

Treble (Tr). Thread over hook twice, insert hook in st and draw thread through st (4 loops on hook), thread over, draw through 2 loops, thread over, draw through 2 loops, thread over, draw through remaining 2 loops.
For a Double Treble (d tr), thread over hook 3 times; and for a Triple Treble Or tr), thread over 4 times, taking off 2 loops at a time as in the tr.

Slip Stitch (sl st). Insert hook through st, catch thread, and, with one motion, draw through both the st and the 1 loop on hook. The sl st is used for joining, or when an invisible st is required.

Block (bi) end Spece (sp). Make 4 d c over 4 sts of preceding Row (this forms 1 bl), ch 2, skip 2 sts, make 1 sp. The bl and sp are used in Filet Crochet.

Picot (p). Make a ch of 3, 4, or 5 sts, according to length of p desired, and s c in the foundation, or in the 1st st of ch.

Cross Stitch. Thread over twice, insert hook in st and draw thread through as for a tr (4 loops on hook), thread over, and draw through 2 loops, thread over, skip 2 sts, insert hook in next st, draw thread through (5 loops on hook), thread over and draw off 2 loops at a time 4 times, ch 2, 1 d c in the center point of the cross, thus completing the cross.

Cluster. Make 3 or more tr in the same st, always holding the last loop of each tr on the hook; then, thread over hook and take off all remaining loops. A tight ch st should then be made to fasten the cluster.

Knot Stitch. Draw a loop on hook out ~ inch, draw thread through, making a ch st of it. Put hook between loop and single thread of this ch and make an s c. Work another similar knot st, skip 4 sts of preceding Row, 1 s c in next. 'Repeat from the beginning to end of Row. Make 2C-inch knot sts to turn, 1 s c over double loop at right of 1st center knot of preceding Row, 1 s c over double loop at left of same knot, 2 knot sts and repeat.

Popcorn Stitch (pc st). Ch 1, 5 d c in next st, drop st from hook, insert hook back in ch-1 and draw loop through the one on hook.

الأحد، 13 يناير 2013

Posh Crochet Baby Booties By Crochet Hooks You


Sweet Little Baby Moccasins Pattern and Tutorial


Sweet Little Baby Moccasins Pattern and Tutorial

Ok guys! It's here it is!!! I know a lot of you have been waiting for it; sorry it's taken me all day to get it up. Like I said earlier, little Eme is teething and is therefore really not in to me doing much else then hold him. And even when I'm am holding him he's fussy, fussy, FUSSY. I may just be a little bit insane right now. Poor guy has at least four teeth coming in though. :(
Anyway! Let's get on with the....


Woohoo!!!

This is the first crochet pattern that I've ever put together for another person to be able to read and follow. Generally, when I'm making a pattern it's all kinds of shorthand that only I can follow. So, what I guess I'm saying is this: If you come across any problems or get stuck at some point, please email me or comment here and I will fix whatever it is that I messed up! haha!

Also, I'd like to thank Mon Petit Violon for allowing me to share her sole pattern. (The soles of these moccasins are from this pattern.) The rest of the pattern is mine. :)


Size:
0-6 months, app. 10 cm foot length.
Materials:
Aprox. 10 g of light weight yarn for color one .
Aprox. 20 g of light weigh yarn for color two.
Crochet hook size “D” (or size needed to obtain gauge.)

(The turquoise/brown yarns are Patons Silk Bamboo in Sapphire and Bark. The pink yarn is a bamboo blend that I can't remember or find the name of. I will figure it out and post it later. Sorry about that! The pink yarn is Natually Caron Country in Rose Bisque.)

Gauge:
4 sts = 2 cm or 5 sts = 1 inch

Stitches used:
st(s) – stitch(es)
ch – chain stitch
hdc – half double crochet
dc – double crochet
sc – single crochet
sl st - slip stitch
dc2tog - double crochet two together (not sure how to do it? video tute (not mine) here.)

Using color 1.
Sole:
Rnd 1: ch11, hdc in 3rd ch from hook, hdc in next 7 sts, 6 hdc in last ch, work on opposite side, hdc in next 7 sts, 5 hdc in last ch, join with sl st in 1st hdc.
Rnd 2: ch1, hdc in next 8 sts, 2 hdc in each of next 5 sts, hdc in next 8 sts, 2 hdc in each of next 5 sts, join with sl st in 1st hdc.
Rnd 3: ch1, hdc in next 8 sts, (2 hdc in 1 st, 1 hdc) 5 times, hdc in next 8 sts, (2 hdc in 1 st, 1 hdc) 5 times, join with sl st in 1st hdc.


Upper:
Rnd 4: ch 1, in back loop only, sc in next 4 sts, dc in next 7 sts, dc2tog 4 times across 8 sts, dc in next 7 sts, sc in next 19 sts, using 2nd color yarn, join with sl st to 1st st.
Rnd 5: ch 1, working in both loops, sc in next 4 sts, dc in next 5 sts, dc2tog 4 times across 8 sts, dc in next 5 sts, sc in next 19 sts, join with sl st to 1st st.
Rnd 6: ch 1, sc in next 4 sts, dc in next 3 sts, dc2tog 4 times across 8 sts, sc in next 19 sts, join with sl st to 1st st.


Cuff:
Rnd 7: ch 3, (skip 1 st, dc in next st, ch 1) repeat around, join last ch 1 to 2nd ch in the ch 3. (fish net st)


Rnd 8: ch 2, 2 dc in ea sp, join with sl st to 1st st.
Rnd 9: ch 2, dc in ea st around, join with sl st to 1st st.
Rnd 10: ch 2, dc in ea st around, join with sl st to 1st st.
Rnd 11: ch 2, dc in ea st around, join with sl st to 1st st.
Rnd 12: ch 2, dc in ea st around, join with sl st to 1st st.
Rnd 13: ch 2, dc in ea st around, join with sl st to 1st st.
Rnd 14: ch 2, dc in ea st around, join with sl st to 1st st. If you want to make the top ruffley, continue with next line, if not, tie off and weave in ends.

For Ruffled Edge:
Rnd 15: (ch 3, insert hook into 2nd ch from hook, sc 1, sc into next st) repeat around. Tie off and weave in ends.


Tie:
Make a chain 80 sts long,weave in to fish net st sps, then attach poms to ends. (if desired.)
OR
Use a ribbon.


Repeat the process for the second moccasin and this is what you'll end up with!! :)

Hope you guys have fun!! If you guys do make any of these PLEASE, PLEASE, PRETTY PLEASE send me a link or a picture so that I can see them!! :)

Also, I prolly don't need to say this, but, this pattern is for personal use only, please don't sell them. If you want to share the pattern with others, feel free, just direct them to my site to get it! Thanks all! :)

I'll be linking to the parties on the side bar! :)

السبت، 2 يونيو 2012

حذاء صيفى لطفلة


اشتغلى سلسال طوله أقصر من مقاس رجل طفلك من 

اسفل بسنتيمتر ونصف من ناحية الأصابع

وسنتيمتر من ناحية القدم لأن قاعدة الحذاء 

سيأتى لها زيادة من الجهتين 

شوفى الصورة دى


دى صورة بتوضح بداية قاعدة الحذاء وهى

واحده فى كل عمل الأحذية

وهى عمل سلسال وشغل داير مايدور

لغاية ماتصلى بشغلك لمقاس رجل طفلك من أسفل

تابعى بعض الصور 


ولغاية ماتوصلى بالشغل للشكل ده ممكن تزينى القاعدة

بخيط مناسب بغرزة البيكو وممكن لأ حسب رغبتك


وده الشكل النهائى لقاعدة الحذاء


الشكل ده زى ماقلت ثابت لكل الأحذية 


حددى بعلامة مكان وجه الصندل ومكان حزامه الخلفى

وممكن تكون العلامة دى بخيط مخالف للون شغلك 


ومن مكان التحديد للوجه 

ارتفعى ب3سلاسل واشتغلى بالعمود بلفة واحده زى كده


بعد ماتخلصى المسافة اللى بين العلامات الأمامية

هاقسم عدد غرز السطر ده الى ثلاث

الثلث الاول مشغول بعمود بلفة وثلث الاوسط سلسال لعمل

الفتحة الامامية للصندل والثلث الأخير بالعمود بلفة

وممكن تصغيرى الفحة الامامية وتنقيص الثلث الاوسط

بتقليل عدد السلاسل عن الثلث ولكن
ملحوظة مهمة
وهى توسط السلسال للفتحة من الامام

تابعى الصورة موضحة كلامى اكتر


نكمل 

بعد السلسال اشتغلى عليه بغرزة الحشو سطر كمان

وممكن تشتغلى الصندل كله بغرزة الحشو هيكون اجمل واجمد


ارجعى واشتغلى كمان سطر بغرزة العمود بلفة

أو سكرين بغرزة الحشو زى كده

بشكل عكسى ارجعى بشغلك واعملى سطر 

حشو مع تنقيص عدد غرز السطر

للأستعداد لضم السطر فى غرزة واحده ( غرزة المروحة )


 اشتغلى 3 سلاسل وبدأئى فى شغل عمةد بلفة فى كل

غرزة للسطر السابق مع عدم انهاء العمود الا فى آخر عمود افقلى الكل
بلفة واحده


عند أحد العلامتين اللى فى الخلف اشتغلى عن اى علامة 

خمس عماويد ابدأئى بعمل 3 سلاسل بمثابة اول عمود

اشتغلى 4 عماويد هيبقى المجموع 5 عماويد

بالمقاس المناسب لطفلك اشتغلى سلسال

يلف حول قدم الطفل من الخلف


ثبتى السلسال عند العلامة الثانية للحزام واشتغلى 5 عماويد بلفة واحده 

كملى عمل السلسال ولفيه على رجل طفلك من الامام

لاخذ مقاس وسح الحذاء بس طولى المقاس شوية لعمل 

عروة قفل الحذاء 

إشتغلى فوق السلسال عمود بلفة وانهى شغلك

بعمل عروة للحزام ويمكنك تزيين حزام الربط الامامى بفستونات

بلون مناسب للون شغلك

بس ضرورى تشتغلى عليه سطر حشو ليكون

جامد وكمان علشان تقفلى العروة

وممكن تثبتى ورده كروشيه فوق الصندل وفوقها

خرزة مناسبه لو هتشتغليه لطفلة

يعنى موضوع الدلع والتزيين فى الشغل راجع لذوقك

وإمكانيات كل واحده المتوفره عندها

وده الشكل النهائى للحذاء


صندل كروشية للاطفال


حذاء صيفى بالكروشيه للبنوتات بالخطوات ...


حذاء صيفى بالكروشيه للبنوتات بالخطوات ...
احبتى فكره العمل سهله جدا والغرزه هى غرزه العمود ..اتمنى ان تعجبكم فكره العمل ..