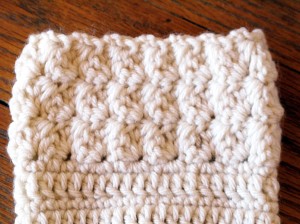
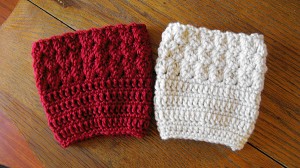
I Had No Idea Boot Cuffs Were So Popular! Ripple Stitch Boot Cuff Pattern
After making a few for my customers, I finally got a chance to write the pattern and wanted to share it with everyone else! I hope you enjoy! Please let me know if you catch any errors or have questions. Constructive criticism is always welcomed. It is the only way to get better!


Supplies:
- I used I Love This Yarn medium (4) worsted weight. The color I used was ivory.
- Crochet Hook Size – H
- Tapestry needle for weaving in the ends.
Abbreviations:
ch – chain
st – stitches
sl st – slip stitch
sc – single crochet
dc – double crochet
hdc – half double crochet
Top Portion of Boot Cuff
Row 1: Ch 11 turn
Row 2: Sc in second ch from hook and across, ch 1 turn. (10 st)
Row 3: Sc and 2 dc in first stitch, *skip 2 stitches, sc and 2 dc in next st*, repeat from * to * across and sc in last st. Ch 1 and turn. (10 st)
Repeat row 3 until the desired measurement and fasten off leaving a long tail.
Join ends together using the long tail and take the side just fastened off using the tapestry needle to sew the front loop only of the stitch and the bottom loop of each sc on the first row. Fasten off and weave in the ends.
Bottom Portion of Boot Cuff
Row 1: Join to cuff by ch 1 and sc evenly around, sl st into first sc (not the ch 1). (Hint) You will later be decreasing stitches so be sure that your stitches will divide by 4 evenly then add two more sc. (Example: Sc 40 stitches plus 2=42 stitches around.) 42 will actually be a good number to use on the average size cuff.
Row 2: ch 2, dc into next dc and around, Sl st in top of ch 2 st.
Row 3: ch 1 and sc in same sp, sc in next st and around, sl st in first sc.
Row 4: ch 2, dc into next dc and around, Sl st in top of ch 2 st.
Row 5: ch 1 and sc in same sp, sc in next st and around, sl st in first sc.
Row 6: ch 2, dc into next dc and around, Sl st in top of ch 2 st.
Row 7: ch 1 and sc in same space, sc in next 3 stitches, *skip next sc, sc in next 4 st*, repeat from * to * across, sl st in first sc.
Row 8: ch 2 and hdc in next stitch and around, sl stitch in top of ch 2 st.
Row 9: ch 1 and sc in same sp, sc in next stitch and around, sl stitch in first sc. Fasten off and weave in ends.
Add buttons if desired.
Please feel free to make or sell products from this pattern! I believe in free enterprise but just ask to link back to my site. Please do not copy this pattern as your own. Please do not re-publish photos as your own.
More free patterns are coming so be sure to keep in touch on my ELK Studio – Handcrafted Crochet Designs Facebook page to stay turned for availability!
God Bless and Happy Crocheting!

ليست هناك تعليقات:
إرسال تعليق